One of those essential remote support software clients I have been fortunate to come across is ScreenConnect
My current company pays through the teeth for LOGMEINRESCUE which if used day to day by all our technicians. The difference between the two on the front end is very little. Both allow remote support and full control of remote computers.
Its the back end cost and customization that makes ScreenConnect miles ahead of LOGMEIN.
Lets start with cost. We currently spend around 1200 dollars per year on a subscription based service with LOGMEIN. I have been here for five years giving us a grand total of 6000 dollars spent for this software (We have had it longer but we will leave it at that) We have several technicians that use it so we must purchase two licenses - so that being said we have spent in the time I have been here 12,000 for 5 years of use. Again we don't own it so once we stop paying its gone.
Enter ScreenConnect.
I bought for myself (Being a IT guy I get to support my whole family and friends "yippy") I was using LOGMEIN free which worked great up till they got rid of it. I spent 325.00 for 1 license of ScreenConnect.
This allows me to connect to a single computer (Single session) at a time, which is fine I'm not likely to be supporting two computers with issues at the same time (I hope) I now have it installed on all my family's computers. I can issue command line remotely without ever having to login in and control the mouse on there side. The nice feature is it shows a screen capture before you connect to give you a idea of what your going to see when you login. I also get full computer info (NAME, WAN IP, MEMORY etc) before connecting.
Now putting all this aside the purpose of this post is to take this great piece of software and integrate it into a WINDOWS PE. I want the client to be able to either boot off a CD or USB or Network and boot the portable windows PE that has ScreenConnect running. This would start a remote session and allow me to connect to run the various tools I need to fix the computer. Here's how.
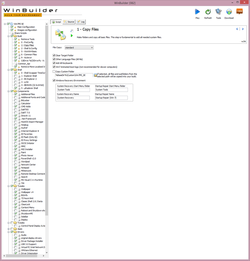
Create your windows PE rescue disk, my choice method is to use WINBUILDER a program designed to give a more gui based PE that allows you to work from it like a standard windows 7 or 8 OS. You then add all your assorted tools to it (Virus Scanners, HDD Checkers etc) My choice project from the site is NETTY this is based off windows 7 (x86 or x64) and gives you a nice workable OS from which to build your image. Make sure to include .NET (ALL VERSIONS)
Download a unattended ScreenConnect session from your installation host and install it on a computer. Unattended would be called "Access" under your ScreenConnect installation.
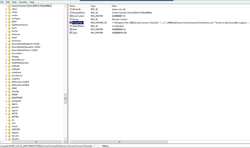
Open REGEDIT on your machine and goto the following KEY.
HKEY_LOCAL_MACHINE\SYSTEM\CurrentControlSet\services\ScreenConnect Client ([yourspecialcode])
You will need to open the KEY and select "ImagePath" key within that registry entry. Right click it and select Modify. We copy the contents out of that registry key and remove non essentials.
Complete ImagePath Key:
"C:\Program Files (x86)\ScreenConnect Client (b03e3c1b0cb494ba)\Elsinore.ScreenConnect.ClientService.exe" "?e=Access&y=Guest&h=support.markcollins.ca&p=8041&s=bae44dad-d947-47e4-9663-5875b785a53b&k=BgIU0ExAAgAABEAAADh7TOZHOjP%2bdIflNjdtRb%2ffzqV4n4NSuhxE6%2fWbYpKyiLJIQ61gzDlxlnol0QyAYs%%2fsf6Akje3FHAFfQwIR5J9C%2b71VDFOM4A9%2fw88OrV19x62F9BQmNcyr%2fpvbOOmBN0XboO%2fciX%2fYxbMwNreur0GcG51Vi%2fpCd9iz%2fGngbHtOcebz7c%2btHuA8CPeIYFtYc5w25OIuu%2flKGeaYZXU6yYCqBozhqeaNHGyn9ozzPMYH5c%2fl8JqH1aUa7itBgnnFWJ%2f3SkJckZdxQFweXGt2vP5z6kR7S21CpIjO12eOHsg%2ba&t=&c=Client1&c=&c=&c=&c=&c=&c=&c="
Required info from ImagePath Key:
?e=Access&y=Guest&h=support.markcollins.ca&p=8041&s=bae44dad-d947-47e4-9663-5875b785a53b&k=BgIU0ExAAgAABEAAADh7TOZHOjP%2bdIflNjdtRb%2ffzqV4n4NSuhxE6%2fWbYpKyiLJIQ61gzDlxlnol0QyAYs%%2fsf6Akje3FHAFfQwIR5J9C%2b71VDFOM4A9%2fw88OrV19x62F9BQmNcyr%2fpvbOOmBN0XboO%2fciX%2fYxbMwNreur0GcG51Vi%2fpCd9iz%2fGngbHtOcebz7c%2btHuA8CPeIYFtYc5w25OIuu%2flKGeaYZXU6yYCqBozhqeaNHGyn9ozzPMYH5c%2fl8JqH1aUa7itBgnnFWJ%2f3SkJckZdxQFweXGt2vP5z6kR7S21CpIjO12eOHsg%2ba&t=&c=Client1&c=&c=&c=&c=&c=&c=&c=
So for the above "RED" text we strip out the rest and leave only the red (Minus the "" quotes) DONT COPY THIS as your will be different this is your connection key to your installation of ScreenConnect.
Save this to a TXT file somewhere safe.
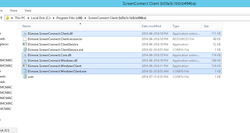
On the computer where you installed your UNATTENDED install (where you got this registry key) we need to grab 5 files from the screen connect folder. The ones highlighted below. Copy these to the same folder your TXT file is located. Usually located in "C:\Program Files (x86)\ScreenConnect"
Now we need to simply need to mount our Windows PE we created in "step 1"
Edit the STARTNET.bat file located in "Windows\System32\startnet.bat" within the PE and add the following to it below or create another bat file and point to it to launch it. Add this below WINPEINIT in the startnet.bat or like I said create another BAT file and just have StartNet launch it with the script below.
In the root of your mounted PE created a folder called "SCREENCONNECT" in this folder we are going to create a txt file called "REMOTE.txt"
In the REMOTE.txt file copy your "SPECIAL CODE" to it example below. No quote either just exact code.
e?=Access&y=Guest&h=support.markcollins.ca&p=8041&s=b16b9926-97e4-444d-a04f-da43d0646cfc&k=BgIAAACkAABSU0ExAAgAABEAAADh7TOZHOjP%2bdIflNjdtRb%2ffzqV4n4NSuhxE6%2fWbYpKyiLJIQ61gzDlxlnol0QyAYs%2bF17N5fzBZR5HscrI%2bOZZ%%2flKGeaYZXU6yYCqBozhqeaNHGyn9ozzPMYH5c%2fl8JqH1aUa7itBgnnFWJ%2f3SkJckZdxQFweXGt2vP5z6kR7S21CpIjO12eOHsg%2ba&t=&c=Client1&c=&c=&c=&c=&c=&c=&c=
Next we create a bat file with the following code in it or have startnet.cmd launch it. Copy below and save as a .BAT or add to STARTNET.cmd
:: remote support starting
for %%p in (Z Y X W V U T S R Q P O N M L J I H G F E D C) do if exist "%%p:\ScreenConnect\Remote.txt" set /p SCVar=<"%%p:\ScreenConnect\Remote.txt"
for %%p in (Z Y X W V U T S R Q P O N M L J I H G F E D C) do if exist "%%p:\ScreenConnect\Remote.txt" start "ScreenConnect" "X:\Program Files\ScreenConnect\Elsinore.ScreenConnect.WindowsClient.exe" "%SCVar%"
There we have it, I can now connect remotely. I add my PE to boot options on each image I deploy. I add a BCD entry as a second boot option and set the timeout to 5 seconds. If a user ever has issues then can choose this boot option and I can connect and fix issues if the OS is not booting.

